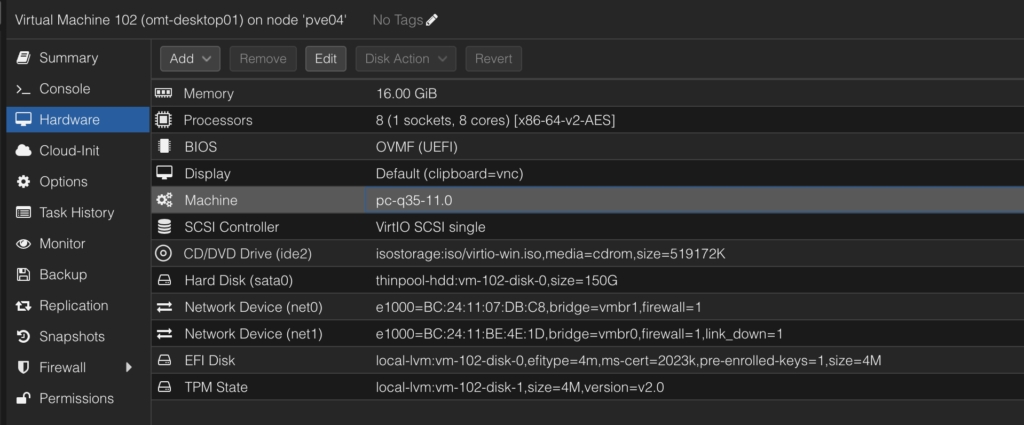
How to Upgrade the VM Machine Version in Proxmox VE

If you have been running Proxmox VE for a while, you may notice that some of your older virtual machines are configured with an older Machine version.

For example, a VM created several Proxmox releases ago might still be using a machine type such as:

pc-i440fx-7.2

or:

pc-q35-8.1

even though the Proxmox host now supports considerably newer versions.

Unlike updating Proxmox VE itself, updating a VM’s machine version isn’t something you necessarily need to do every time a new version becomes available. However, there are situations where upgrading it is useful — and eventually it may become necessary.

In this article, we’ll look at what the machine version actually does, why you might want to upgrade it, and how to safely change it.

What Is the Proxmox VM Machine Version?

Despite how it might sound, the Machine setting isn’t the version of your operating system or even really the “version” of your VM.

Proxmox VE uses QEMU/KVM to provide virtual machines. The machine type defines the virtual motherboard and hardware layout presented to the guest operating system.

You’ll generally encounter two families of machine types:

  • i440fx — the older, very widely compatible virtual chipset.
  • q35 — a newer virtual chipset with PCI Express support and other more modern hardware characteristics.

Each of those can also have a version associated with it.

For example:

pc-i440fx-8.1

means that the VM is using the i440fx machine type while emulating the hardware behavior associated with QEMU’s 8.1 machine version.

This versioning is intentional. QEMU occasionally changes its virtual hardware implementation as bugs are fixed and features are added. Proxmox can keep a VM on an older machine version so that upgrading the Proxmox host doesn’t suddenly change the virtual hardware that the guest sees.

This is particularly important for Windows.

Proxmox automatically pins Windows VMs to a specific machine version because Windows can be sensitive to changes in hardware enumeration.
Why Would You Upgrade the Machine Version?

There isn’t usually a reason to update every VM simply because a newer machine version appears in the dropdown.

In fact, if the VM works perfectly and Proxmox isn’t warning you about its machine version, leaving it alone is often perfectly reasonable.

There are several circumstances where upgrading makes sense, though.

1. Proxmox Is Warning You That the Machine Version Is Deprecated

This is probably the most compelling reason.

Proxmox specifically recommends updating the machine version if you receive a deprecation warning. Old machine versions cannot necessarily be supported forever, and very old versions can eventually disappear from future versions of QEMU or Proxmox VE.

If you’re several generations behind, it’s better to deal with the VM during a planned maintenance window rather than discover after a future Proxmox upgrade that your old machine configuration is no longer supported.

2. You’re Preparing for a Major Proxmox VE Upgrade

I tend to look at machine versions when preparing older installations for a major Proxmox upgrade.

Imagine a VM that was originally created years ago, survived several Proxmox releases, and is still pinned to the machine version that existed when it was first created.

The guest operating system may have been upgraded multiple times, but its virtual motherboard configuration hasn’t changed.

Before moving the entire Proxmox environment forward again, it can make sense to bring especially old VM configurations up to a reasonably current machine version.

Proxmox has specifically advised checking for machine versions that will no longer be available before major upgrades.

3. You Restored or Migrated an Old VM to a New Proxmox Host

This is another common scenario.

Suppose you have a VM originally created on Proxmox VE 6 or 7 and eventually restore it onto a much newer Proxmox installation.

The disks and operating system may work perfectly, but the VM configuration can still contain the older QEMU machine version.

That backward compatibility is a good thing — it is one of the reasons the VM can still boot normally — but once you’ve confirmed everything is working on the new environment, you may decide to modernize the virtual hardware as well.

4. A Newer Machine Version Provides Something You Need

Occasionally, QEMU or Proxmox features depend on a minimum machine version.

One example documented by Proxmox is USB hotplugging, which has machine-version requirements for certain guests.

Newer machine versions can also contain fixes to virtual hardware behavior.

This doesn’t mean upgrading the machine version is a magic performance button. You generally shouldn’t expect a dramatic increase in CPU or disk performance simply by changing it.

Think of it more like updating the motherboard revision of a physical machine.

5. You’re Cleaning Up a Long-Lived Proxmox Environment

Production virtualization environments have a tendency to accumulate history.

You may eventually find something like:

  • VM 101 — machine version 6.1
  • VM 102 — machine version 7.2
  • VM 103 — machine version 8.1
  • VM 104 — Latest

Nothing is inherently wrong with this, but it can make future upgrades more complicated.

During planned maintenance, bringing especially old virtual machines up to a newer supported baseline can reduce the amount of legacy configuration you’re carrying forward.

When Should You NOT Upgrade It?

There are also some good reasons not to immediately change the setting.

The most obvious is:

The VM works, its machine version is supported, and you don’t need anything provided by a newer version.

There is little benefit in introducing a virtual hardware change just for the sake of having the highest number in the dropdown.

You should also be cautious with VMs running software that is sensitive to hardware changes.

That could include:

  • Windows activation
  • Software licensed against hardware identifiers
  • Appliances with unusual virtual hardware assumptions
  • Older operating systems
  • VMs using PCI or GPU passthrough
  • Very old Windows installations

Machine-version changes can affect the hardware topology visible to the guest. Proxmox maintains the version system specifically to avoid unexpectedly making those kinds of changes.

Windows deserves particular caution. Proxmox introduced automatic machine-version pinning for Windows specifically to keep its virtual hardware layout consistent across QEMU upgrades.

Before You Upgrade

Treat a machine-version upgrade like any other virtual hardware modification.

Before doing anything, I recommend:

  1. Make sure you have a current backup.
  2. Verify that the backup completed successfully.
  3. Schedule a maintenance window for an important VM.
  4. Record the current machine type and version.
  5. Make sure you have console access through Proxmox in case the guest loses network connectivity.

For an especially important VM, taking a screenshot of the current Proxmox hardware configuration isn’t a bad idea either.

You can also view the configuration from the Proxmox shell.

For a VM with ID 101:

qm config 101

Look for the machine: entry.

For example:

machine: pc-q35-8.1

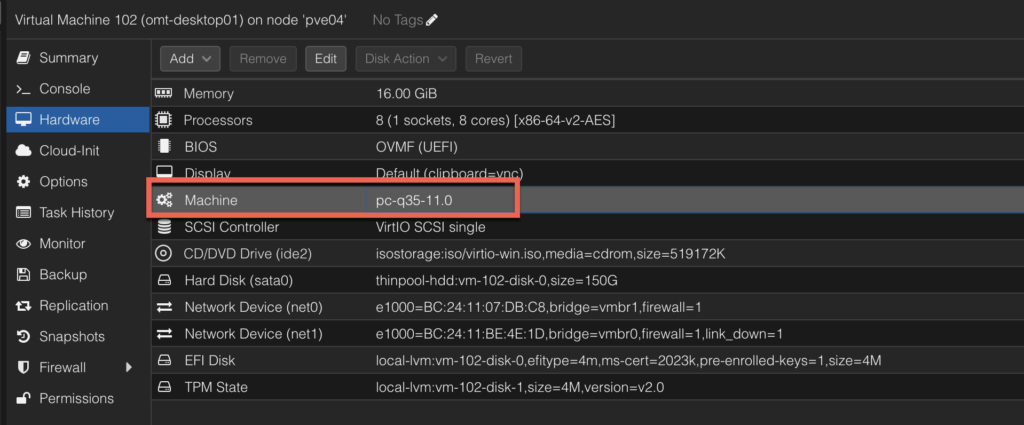
How to Upgrade the Machine Version in Proxmox VE

Changing the machine version through the Proxmox web interface is straightforward.

  1. Select the VM in the Proxmox VE interface.
  2. Open Hardware.
  3. Select Machine.
  4. Click Edit.

You’ll see the machine type and the versions available on your Proxmox host.
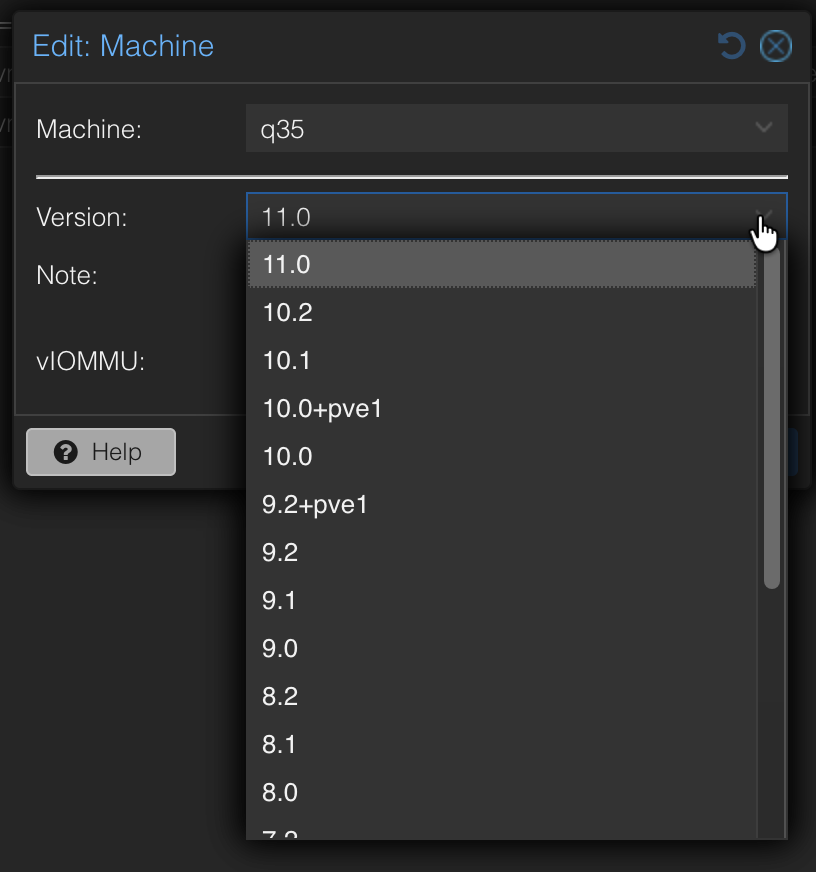
At this point, you have a couple of decisions to make.

Don’t Change i440fx to q35 Just Because You’re Updating the Version

This deserves special attention.

Changing:

pc-i440fx-7.2

to:

pc-i440fx-[newer version]

is a machine version upgrade.

Changing:

i440fx

to:

q35

is a machine type change.

Those are two different operations.

If the goal of your maintenance is simply to update an old machine version, I recommend keeping the existing machine type.

In other words:

i440fx → newer i440fx

or:

q35 → newer q35

Changing from i440fx to q35 can be useful, particularly when you need PCIe-oriented features or certain passthrough configurations, but that should be treated as its own migration rather than casually combined with a machine-version upgrade.

Making one major virtual hardware change at a time also makes troubleshooting considerably easier.

Choosing a Version

You’ll generally see several supported versions as well as a Latest option.

For a Linux VM, using Latest may be perfectly appropriate depending on your environment.

When Latest is selected, the VM can use the newest applicable machine version after a fresh start as the underlying QEMU version changes.

For Windows servers and other important production systems, I generally prefer explicitly pinning the machine version.

That gives you a known virtual hardware configuration rather than allowing it to move automatically when the virtualization stack changes.

This is essentially the same philosophy Proxmox uses when it automatically pins Windows guests.

Select the desired version and save the change.

Then restart the VM.

Updating the Machine Version From the Command Line

You can also perform the same operation using qm.

For example, if VM 101 is using Q35 and you want to set it to machine version 10.0:

qm set 101 --machine pc-q35-10.0

For an i440fx VM:

qm set 101 --machine pc-i440fx-10.0

The exact versions available depend on the QEMU/Proxmox version installed on your host, so check what your system supports rather than blindly copying a version number.

You can inspect the resulting configuration with:

qm config 101

Start the VM and Check Everything

Once the VM starts, don’t just see a login screen and declare victory.

Check the services that actually matter.

For a Windows Server VM, for example, I would check:

  • Network connectivity
  • IP configuration
  • Device Manager
  • Disk visibility
  • Windows Event Viewer
  • Application services
  • Windows activation
  • VirtIO devices
  • Any hardware-bound software licensing

For Linux:

ip addr
lsblk
lspci
systemctl --failed

If it’s a database, web server, domain controller, file server, or another critical service, verify the actual application as well.

Machine-version changes have historically caused guest hardware to be enumerated differently in certain circumstances. Proxmox even maintains documentation describing compatibility issues associated with particular historical QEMU machine-version changes.

That is exactly why I recommend having a backup and testing the guest afterward.

What About a Proxmox Cluster?

Clusters add another consideration.

Don’t update a VM to a machine version that some of your nodes cannot support if you expect that VM to migrate or fail over to those nodes.

For example, suppose you have:

pve01 — newer Proxmox/QEMU
pve02 — newer Proxmox/QEMU
pve03 — older Proxmox/QEMU

If you select a machine version that only exists on pve01 and pve02, you may prevent the VM from starting on pve03.

In a cluster, I prefer to upgrade the Proxmox nodes first, confirm that every node that may run the VM supports the desired machine version, and then update the guests.

This is especially important in HA environments.

Can You Go Back?

This is why writing down the old version and taking a backup matters.

If the new machine version causes problems, shut the VM down and change the Machine setting back to its previous version.

For example, if you changed:

pc-q35-8.1

to:

pc-q35-10.0

and the VM behaves strangely, shut it back down and restore the previous machine version.

That said, don’t rely on rollback as a substitute for a backup.

If the guest operating system itself reacts to newly detected hardware or modifies its configuration after booting, simply changing the virtual motherboard version back may not undo every change made inside the guest.

Should You Upgrade Every VM?

No.

I wouldn’t log into a Proxmox server, see that a VM is two machine versions behind, and immediately upgrade it.

My rule is closer to this:

If it isn’t deprecated and I don’t need a newer machine version, there probably isn’t an urgent reason to touch it.

But if I’m already performing maintenance, upgrading Proxmox, migrating an old VM, or dealing with a machine version that’s approaching obsolescence, then updating it makes sense.

The important thing is understanding that this setting represents virtual hardware compatibility, not simply another software version number.

A Practical Example

Let’s say you have a Windows Server VM originally created several Proxmox releases ago.

Today it looks something like this:

VM: 101
OS: Windows Server
Machine: pc-q35-7.2

Your current Proxmox installation supports much newer QEMU machine versions.

The VM works, but you’re preparing for another major Proxmox upgrade.

This is a good maintenance opportunity.

I would:

  1. Back up VM 101.
  2. Verify the backup.
  3. Record pc-q35-7.2 as the current machine configuration.
  4. Shut down Windows cleanly.
  5. Open Hardware > Machine.
  6. Keep the machine type set to q35.
  7. Select a newer supported machine version.
  8. Start the VM.
  9. Verify network adapters, disks, Device Manager, application services and Windows activation.
  10. Leave the VM running on the new version once everything checks out.

If there is a problem, shut it down and return the Machine setting to pc-q35-7.2.

That’s considerably safer than waiting until some future Proxmox upgrade forces you to deal with a decade’s worth of virtual hardware changes at once.

Final Thoughts

The Machine setting is one of those Proxmox options that’s easy to overlook because most of the time you never have to touch it.

That’s largely by design.

Proxmox and QEMU use versioned machine types to allow the virtualization platform underneath a VM to evolve without constantly changing the hardware presented to the guest.

For long-lived virtual machines, though, eventually you’ll encounter systems pinned to much older machine versions.

When that happens, don’t simply select the newest option and hope for the best. Back up the VM, keep the same machine family unless you have a reason to change it, update the machine version during a maintenance window, and verify the guest afterward.

It’s a simple change in the Proxmox interface, but it’s worth remembering what you’re actually changing:

You’re upgrading the virtual motherboard underneath the operating system.
Why I Still Prefer PHP in 2025 (and You Might Too)

It’s 2025, and the tech world is buzzing about serverless architectures, Jamstack, Node.js everything, and the latest bleeding-edge JavaScript frameworks. Yet here I am — still writing, deploying, and maintaining apps in good ol’ PHP.

Am I stuck in the past? Not at all. In fact, I’d argue that PHP is one of the most pragmatic and underrated tools you can use today, especially if you care about performance, simplicity, and control.

Here’s why I still prefer PHP in 2025 — and why you might want to reconsider it too.

It Just Works

I run infrastructure. My focus isn’t chasing frameworks — it’s uptime, stability, and doing more with less. PHP is rock solid. You drop in a .php file, configure your virtual host, and it’s running. No compiling, no containers, no special runtime environments.

All you need to run PHP is a web server and PHP. If it can run Linux, it can run a web server like Apache or NGINX and PHP. Whether that’s a smart toaster or a $100k enterprise-grade server.

Also, if frameworks are your thing, there are some great PHP frameworks out there that can help you quickly write apps.

Massive Ecosystem and Compatibility

PHP runs everywhere. Nearly every shared hosting provider, control panel, and CMS still supports it. That kind of ubiquity matters when you manage infrastructure for clients at all technical levels.

Whether I’m building something custom or tweaking existing systems like WHMCS, Blesta, WordPress, or WebsiteBaker — PHP is the common language.

Bonus: most legacy systems still use it, and I don’t need to rewrite everything in Python or Go to modernize them.

Mature, Stable, and Secure (Yes, Really)

Modern PHP — especially versions 8.1 and up — is a different beast than what people remember from the early 2000s. It now includes:

  • Strong typing
  • Native attributes (annotations)
  • JIT compilation
  • Performance that rivals Node and even Go in some scenarios

Security updates are regular, community support is strong, and many libraries are actively maintained. If you’re writing modern PHP, you’re writing clean, maintainable, and secure code.

You Control the Stack

As someone who runs a hosting company, I like having full control. I don’t want to spin up Node daemons or manage 12 different services for one app. With PHP:

  • I can run everything under FPM pools for resource isolation.
  • Logs are easily centralized.
  • Updates don’t break production apps due to breaking runtime changes.

PHP plays really well with traditional hosting and modern infrastructure — and doesn’t force me into an ecosystem I don’t want.

It’s Ideal for the Web

PHP was built for the web. Everything about it — from how it handles requests, sessions, and forms — makes it a natural fit for websites and APIs.

Unlike general-purpose languages that were retrofitted into web development, PHP was made for this. And in my experience, that means less friction and less time wasted reinventing the wheel.

It’s Not Dead — It’s Evolving

The PHP community is alive and thriving. Laravel continues to innovate. Symfony powers enterprise-grade apps. New frameworks like Mezzio and Slim focus on performance and microservices.

And let’s not forget that WordPress, which powers over 40% of the web, still runs entirely on PHP.

So no — PHP isn’t dead. It’s quietly powering the web, while developers argue on Reddit about the best way to do the same thing in six JavaScript frameworks.

Final Thoughts

I’m not saying PHP is the best tool for every job. But when it comes to building fast, reliable, maintainable systems for the web — especially in a hosting or infrastructure environment — PHP continues to deliver.

If you haven’t touched it in a while, give it another shot. You might just find that the language you thought was outdated is more modern than ever — and more practical than most alternatives.

And that’s why I still prefer PHP in 2025. Maybe you will too.

What happened to PacketLife.net?

Happy April! This is not an April Fool’s joke. At some point in late Summer of 2024, the networking website “PacketLife.net” went offline. At first, maybe thinking it was a server error, days went by. Then weeks. And months. It became apparent it wasn’t coming back. No one really knows why (or at least I haven’t found why) despite Jeremy Stretch, the author, being fairly active with his NetBox project (something I intend to cover here on The IT Cave).

There was a great amount of knowledge on PacketLife.net and that can’t be lost. While it’s on the Internet Archive, we know that lately the Internet Archive has been under all sorts of attacks. I’ve taken the liberty to re-host the last available versions of the Cheat Sheets on the Cheat Sheets page here. I plan to expand the page with cheat sheets of my own at some point.

So if you’re wondering what happened to PacketLife.net, we don’t know. Jeremy hasn’t said. But at least the knowledge isn’t lost to the sands of time.

Proxmox VE Cluster – Made Simple

I love Proxmox VE and I love clustering Proxmox VE. What lead me down this journey was that I built a quick and dirty cluster, but because it was built quick and dirty, it lacks proper connections between each node. Each node only has a 1 Gbps copper link, and, well, it’s not great. It accomplishes the goal of a cluster, but things like HA, moving VMs for host maintenance, etc. are too much of a pain. Granted, local storage will always move slower than shared, and this is also without Ceph.

Building a Better Cluster – For Cheap

Normally, a cluster will be like a star topology – every node links to a switch at the center. This is great, but it requires having a switch. While I would like to have a switch, space and power are at a premium. So what is the solution? A fully redundant mesh network!

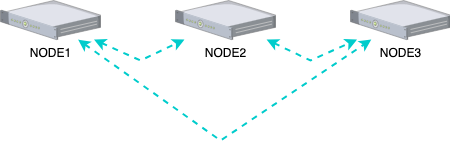
This is what we are going to be building:

As you can see, Node 1 is linked to Node 2 and Node 3, Node 2 is linked to Node 3. If any link is cut (or just unplugged), there is a redundant path. I’m using some 2x 10 gigabit SFP+ cards in each of the servers, some 10 gigabit SFP+ SR fiber transceivers from FS.com, and 3x OM4 50/150 Multimode 1.5 meter fiber cable.

Proxmox VE Setup

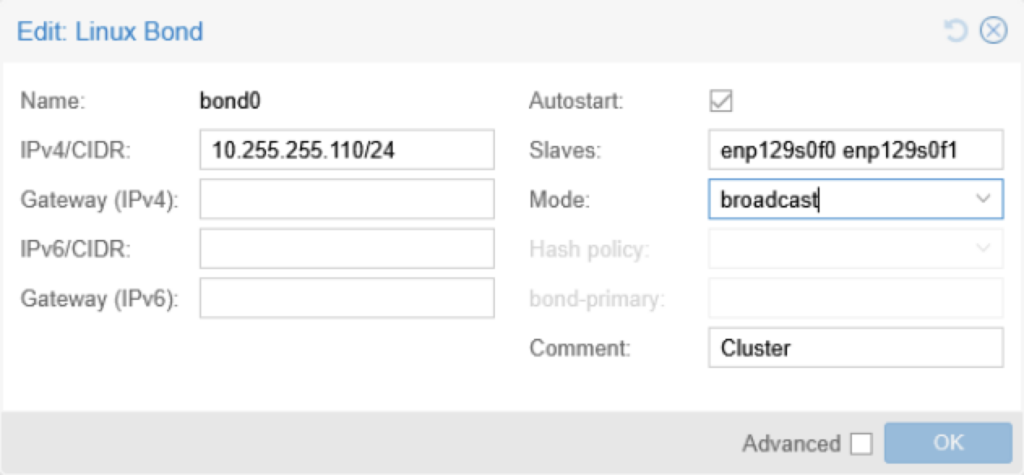
In Proxmox VE, we need to create a Linux Bond interface on each of the servers. The slave ports will be the interfaces of your SFP+ card, which for me is enp129s0f0 and enp129s0f1. You will need to set the mode to broadcast and then set an IPv4 and CIDR for the network. Do not set a gateway.

Once you do this, you can then create your cluster and use your bond interface IP for the cluster. Don’t forget to go to Datacenter > Options and set Migration Settings to use your cluster network.

And there you have it! A cluster without a switch!

Keep in mind that this does not scale well. Also remember that local storage will take awhile to migrate! You can use Ceph in this setup which will work better. Good luck!

Welcome (back) to “The IT Cave”

Welcome to The IT Cave, a tech site for IT professionals or for anyone who wants to learn a bit more about technology.

Brief History

I initially started “The IT Cave” in May 2012 as a way to document what I was working on and fixes for issues I came across in my job – basically to break out my tech posts from my personal posts on my personal blog. I was basically a year into my first job as a real systems administrator for a mortgage company in Orlando, Florida.

At the time, I had a private office without windows and I liked to work in the dark which lead the people in the office to start referring to my office as “the cave”. The name stuck, and so, welcome to The IT Cave!

This site was regularly updated from 2012 to 2018. In 2018, I forgot to renew the domain, and it got snatched up by some Chinese spam. For the last 7 years, I have been trying to get it back. I saw that the domain expired back in December of 2024 and was moving its way though the motions of being deleted (and I noticed it was in redemption in early March 2025, set to be deleted soon). I finally snagged my domain back – on auto-renew this time!

What I’m up to Now

Well, a lot has changed since I last blogged in 2018. I’ve left Florida and Ohio. I’m still working in IT, although I’ve changed jobs a few times. So much has happened, I wish I had this blog. I hope to restore useful content.

Last year, I wrote a book about cPanel (recently updated) and another book about WHM. Oh, I also wrote a book about customer service. Feel free to check them out and even buy a copy!

What’s in The Cave?

A knowledge base of information! I will share any tips, tricks, and wisdom. If you have questions, please ask. If there is a something you want to know, please ask. I’ll cover topics from Linux to Windows, virtualization, and everything in between. Enjoy!

Everything “The Verge” got wrong

Note: This was originally published on the old version of The IT Cave and is content that has been restored for historical context.

By now, I’m sure you’ve heard or seen the video from The Verge called How we built a $2000 custom gaming PC. I wanted to share my thoughts on this video because although The Verge pulled it from YouTube after disabling comments and then shortly after disabling voting, it’s still on the Internet (for now; thanks MSN!).

There are some great YouTubers who covered it. Although I have a YouTube channel, I’d rather document this in words so that you can share with your friends who might be considering building a computer and what not to do (and I can’t stress this enough – do not do what The Verge did!).

Your Budget

First, they start the video off by telling you that a $1000 (or less) gaming PC is trash and won’t cut it. You need to spend at least $2000.

Now the hardware camera view is pretty common and nothing wrong here. You can most definitely build a $2000 PC. Or a $1000 PC. Or a $800 PC. Or a $500 PC. That’s the best thing about the times we live in today.

Tools You Need (According to The Verge)

We are now told what tools we need:

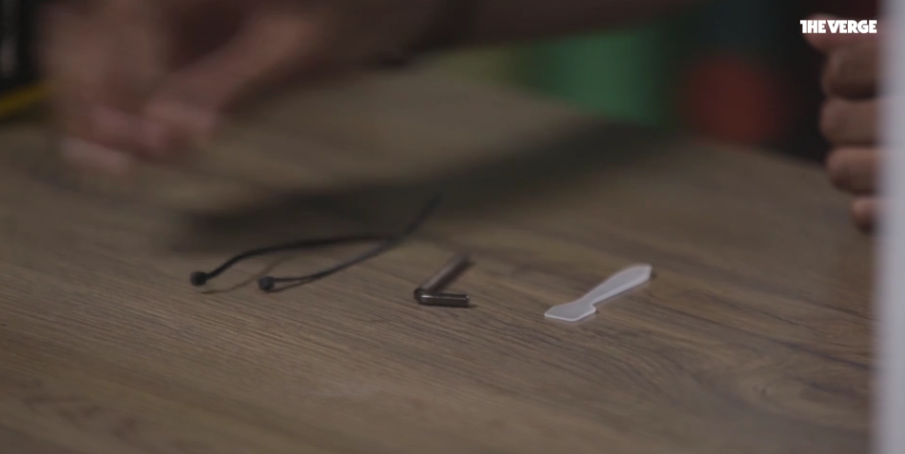
  • A table… “preferably not metal”
  • Thermal paste applicator
  • An Allan Wrench
  • Swiss Army Knife… with a Phillips screwdriver
  • Tweezers

And this is the part where the video starts foreshadowing how this video is going to go down. You definitely do not need a thermal paste applicator. I’m also not sure where the Allan wrench comes in because we don’t see it used in the video… and I’ve never used an Allan wrench except for when I work on some servers. Now the part where you’re confused, as was I. Tweezers. Yes, he called zip ties tweezers. I had to pause the video and give a blank stare.

Oh! And I forgot the one essential thing! Your anti-static rubber band… I mean wrist band.

n case you don’t know what an anti-static wrist band looks like, let me show you:

A few differences from a rubber band and an anti-static wristband:

  • It has a metal conductor that touches your skin
  • It adjusts firmly to your wrist so the metal is always in contact with your skin
  • It has a detachable alligator clip that clips on to something metal or the part that you can connect to your electrical system’s grounding if nothing metal is near you but you have an outlet

In the video, he mentions that it’s “to protect you and the parts”. There’s no electricity flowing through anything. It’s more of protecting the parts from you.

What’s a computer?

This next section explains what a computer is and how it works in a sense. It’s actually fairly factual and has some really good graphics.

Nice graphics!

Installing the parts

If you thought the beginning wasn’t that bad, we’re just warming up.

Brace yourself

So again, this is where things go downhill. We’re introduced to the motherboard going into this build. When installing the I/O shield, it’s referred to as “the brace”. No, it’s not a brace. It’s not bracing anything. It’s a shield. We’re also suggested to “hammer it in” but don’t do that. It snaps in. You just have to give it some force, but it just snaps. Trust me.

Hammering in the brace.

RAM it in

So, the RAM we’re being sold is presumably DDR4 at 2666 MHz which is “pretty fast”. It’s actually decent mid-grade RAM.

They only chose this RAM because it has LEDs and gaming machines need LEDs.

Now to install the RAM, you “line up the logos”, not the notch. What if the RAM doesn’t have a logo on it? Well, guess it doesn’t exist. Also, we’re shown how not to install RAM. Do not install RAM by popping in one edge and then the other. This is a great way to damage the RAM stick and/or the slot.

Line up the logos to install RAM.

Installing the SSD

This actually went right.

Hey! They can install something right at least.

Installing the GPU in the right lane

Again, this gets cringy. We’re told that you can just select a PCI-E slot based on what looks good. This is not true. Read your motherboard’s manual to find out what the bandwidth limitation is on which port. If you install a GPU in a slower port that it’s not designed for, you may wonder why you get a low frame rate. The Verge says install where you want based on “it looks good”.

I think the GPU looks good here so this is where I’m going to install it.

I have the powah

And now we’re moving on to installing the power supply… err… “brick”. This is probably the worst part of this build. So we’re told that we need to set the power supply on insulators as so not to short out the system.

Yeah. That was basically my expression. And then we’re told to make sure it touches the back of the case. So clearly the script writers at The Verge didn’t think that one through completely. And while we’re installing the power supply, be sure to put the fan facing the back of the case where there is zero air flow. We all know power supplies work better when they’re hot.

Nope. Wrong way.

Installing The Gibson

So now we move to the CPU installation. This process is simple. Line up the arrows on the socket and lock in. Well, that’s too easy. So we need to over complicate it. First, we toss away the CPU socket protector to expose the “CPU holder or slot”. Never throw away that socket protector. Most manufacturers require it if you need to RMA. Second, it’s a socket.

Now we need to use a “CPU holder” to install the CPU. Nevermind all you need to do is line up the arrows.

This is not required.

Now here’s where things get weird. We’re shown some B-roll footage of him using a plastic piece on the CPU pins. Do not do this. Ever. You do not need to touch the CPU pins. Ever. If you bend them too much, you can break them, and your CPU will never work again. Ever. Do. Not. Do. This. Ever. EVER.

WHAT ARE YOU DOING?! STOP!

And then we’re told that Asus includes a CPU installer. Or “brace” as it’s also called. Again, you don’t need this. Just line up the arrows. Then he tells us, “line up the gold arrows.” Head meet desk.

Or, crazy idea, just install it on the motherboard.

And then we’re shown that The Verge back peddled and decided not to use it… because you don’t need to.

Do as we say, not as we do.

Now we get on to applying the cooler. To do this, even though the cooler has thermal compound already pre-applied, it’s apparently not good enough (it is), and you need more (you do not).

This is fine.

And now we apply thermal compound for some reason. And in the worst way possible. When you apply thermal compound, you only need one dot the size of a pea. Not multiple and certainly not this much. And definitely not when you already have thermal compound pre-applied. If you want to use your own thermal compound, you need to use an alcohol pad to clean off the pre-applied compound completely. If you don’t, you risk gaps and you can literally fry your CPU. Always clean it if you’re not going to use the stock. And don’t apply this much.

Where’s the CPU? Oh, it’s under all that thermal compound.

Oh, and while we’re installing the CPU cooler, we want it “basically touching” the CPU – because The Verge doesn’t understand how heat transfer works.

It needs to touch.

Benchmarking

Now once everything is assembled, it’s time to test. So what better to test than League of Legends? Now I love LoL. It’s a great game I enjoy. Why? Because it can run on a toaster. Literally, the only requirements is that you have a single CPU core. I have played LoL successfully on business grade computers. You know, computers rated for basically just web browsing and word processing, not games. Why didn’t they use something like Planet Coaster? Even on my semi-decent gaming machine, I couldn’t run Planet Coaster so that would have been a better benchmark.

“It plays LoL! We’re good.”

Roll credits

And there you go. How not to build a computer, presented by Capital One. Seriously, Capital One. Give me some money and we’ll build a rocking system a million times better than this mess. And it’ll be done right.

“Unfortunately presented by… Capital One. We’re sorry.”